Chicken Char Siew in Steamed Buns

Leave a comment

BBQ Chicken Mantou

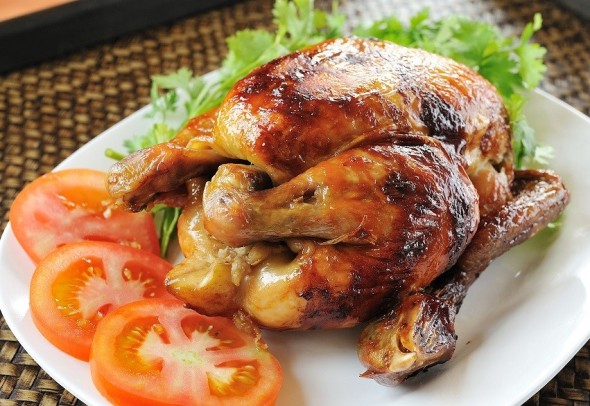
Whether it is for Chinese New Year gathering or any other parties, this Chicken Char Siew will be a hit. You can marinate it at least one week in advance and keep it frozen. One day before the party, defrost and bake it. You can serve the Chicken Char Siew chopped as a filling in buns, crepes or even as pizza topping. For those who don’t eat pork, this recipe brings you into the world of Char Siew.

Preparation time:   20 minutes

Cooking time: 25 minutes

Serves: 4

TO MARINADE THE BARBECUE CHICKEN

150 g Char Siu Sauce (this is available in most supermarkets)

3 garlic cloves, finely grated

25 g finely chopped ginger

20 g finely chopped spring onions

2 tablespoon light soy sauce

¼ teaspoon red food colouring (optional)

500 g chicken fillet cut into 6 cm-wide strips

2 tablespoons Q.B.B. Pure Ghee, melted

2 tablespoons honey

Mantou buns or soft rolls

100 g Hoisin Sauce (this is available in most supermarkets)

100 g tomato ketchup

Chilli flakes (optional)

1 cucumber, seeded, cut into 1 cm X 6 cm pieces

4 spring onions, cut into 6 cm pieces

METHOD

  1. Combine Char Siu Sauce, garlic, ginger, chopped spring onion, soy sauce and red food colouring in a large stainless bowl or glass.
  2. Add chicken pieces and toss to coat. Cover and place in the fridge overnight to marinate.
  3. Preheat oven to 200°C. Line a baking tray with baking paper.
  4. Transfer chicken pieces to tray, keeping aside the leftover marinade.
  5. Roast for 20 minutes or until cooked through.
  6. Combine the reserved marinade with the melted Q.B.B. Pure Ghee and baste the chicken pieces with it.
  7. Preheat grill to high and grill chicken pieces for 2 minutes on each side or until starting to char.
  8. Transfer chicken pieces to a plate and brush with honey.
  9. Steam buns till warm.
  10. Combine the Hoisin sauce, tomato ketchup and chilli flakes in a small bowl.
  11. Carefully split open each bun and fill with chicken, cucumber and spring onion.
  12. Drizzle generously with the sauce. Serve warm.


Taiwanese Pineapple Shortbread

Leave a comment

Taiwanese Pineapple ShortBread

I had my first bite of the Taiwanese Pineapple Shortbread about 16 years ago in Taiwan. It was called “Taiwanese Pineapple Cake” then. I bought it from a souvenir shop. It was like a little golden coloured box and when I bit into it, it just crumbled and melted in my mouth and the pineapple filling was so aromatic (I found out later that some of the Taiwanese bakeries actually mix candied winter melon puree for that additional flavour) and just about right in sweetness.

Here, I am sharing with you an almost similar recipe but better because you will be using the best ingredients! It is cheap, very easy and fast to make! If you are generous and not greedy, you can serve these awesome buttery pineapple shortbreads to your guests or give it away as a Chinese New Year gift. You don’t have to give a jarful or hundreds. You can make one for each member of the family and wrap it attractively.

These pineapple shortbreads are best served with hot tea.

Serves: 12 pieces

HOME-MADE PINEAPPLE FILLING

1 kg grated fresh ripe pineapple (about 2 medium pineapples)

250 g caster sugar or more

3 cm cinnamon stick or 1 teaspoon ground cinnamon

4 pandan leaves

2 teaspoons golden syrup

METHOD

  1. Squeeze out some of the juice from the grated pineapple and either drink it or discard it.
  2. Put all the ingredients into a non-stick pan and cook over medium heat for about 20 minutes.
  3. Lower the heat and cook further for about 20 minutes stirring constantly over a low flame till the jam is thick enough to be rolled into balls. You need to check the consistency – if it is too hard or too sticky, splash about 50 ml water and mix evenly.
  4. Remove and discard cinnamon stick and pandan leaves.
  5. Cool the jam thoroughly and roll into twelve cherry-sized balls (20 g each). Keep it refrigerated for about 20 minutes before using.

TO MAKE THE PASTRY

250 g pineapple filling (home-made or shop bought)

200 g cake flour

40 g icing sugar

30 g milk powder

30 g custard powder

70 g Q.B.B. Pure Ghee, chilled and diced

700 g salted butter, chilled and diced

METHOD

  1. Preheat oven to 180°C.
  2. Divide pineapple filling into 12 portions and shape into balls. Keep aside.
  3. Sift flour, icing sugar, milk powder and custard powder into a bowl.
  4. Add Q.B.B. Pure Ghee and butter and rub in till the mixture resembles fine bread crumbs.
  5. Knead to form a soft dough and divide into 12 portions (about 40 g each).
  6. Flatten the dough lightly and place a ball of pineapple filling on it. Wrap the dough round the pineapple filling.
  7. Place this into a square metal mould and press lightly to flatten on BOTH sides.
  8. Place on non-stick paper.
  9. Bake for 25 minutes or until golden brown – FLIP ONCE during baking.
  10. Cool before unmoulding.


Choc Chip Cornflakes Cookies

Leave a comment

Capturefile: D:ProcessDevagi cakes Tiff n JpegImage-004.cr2 CaptureSN: 830502895.000004 Software: Capture One PRO for Windows

These days I see more and more people purchasing cookies and cakes for the Chinese New Year celebrations. Although, it is convenient to just get a few tins of cookies off the shelves, please beware that most of the commercially made cookies and cakes are prepared with sub-standard ingredients that may ruin your health.

This year, perhaps you would want to make the cookies yourself – for your family or as gifts for your loved ones. Baking is such fun – especially if you can get your friends, children or colleagues to join you in the baking session.  This Choc Chip Cornflakes Cookies recipe make look simple –the Q.B.B. ghee brings out the buttery flavor and makes the cookies crisp too.

Preparation time:     15 minutes

Cooking time: 20 minutes

Makes: 24 cookies

125 g Q.B.B. ghee

120 g caster sugar

1 teaspoon vanilla essence

1 egg yolk

grated zest of lemon

140 g self-raising flour

15 g corn flour

60 g mini chocolate chips

100 g cornflakes, crushed lightly

METHOD

  1. Cream Q.B.B. ghee, caster sugar and essence until the mixture becomes light and fluffy.
  2. Beat in egg yolk and lemon rind. Sift in the self-raising flour and corn flour; add in the chocolate chips and combine well. At this stage the dough will be sticky.
  3. Drop teaspoonful of mixture onto the crushed cornflakes and ensure it is covered with the cornflakes.
  4. Shape into balls and place on lightly-greased baking trays. Alternatively, you can place the balls into small paper baking cases.
  5. Bake in preheated oven at 180°C for 20—25 minutes or until lightly golden brown.
  6. Cool on wire racks before storing in airtight containers    


Anchovies Crostini

Leave a comment


anchovies crostini

Not sure what to serve your guests for the New Year party? Encourage your guests to dive into this tasty finger-food appetizer. You need not stick to the canned anchovies………replace with tuna flakes or sardines or keep it vegetarian by omitting the anchovies. Ensure that the bread is fresh.

Preparation time: 25 minutes

Cooking time: 20 minutes

Serves: 6


2 tablespoons Q.B.B. Pure Ghee

120 g onion, finely chopped

80 g red capsicum, sliced thinly

80 g yellow capsicum, sliced thinly

100 g cherry tomatoes, halved

12 fresh basil leaves, shredded

1 small can anchovies, chopped or left whole (including the oil)

Salt and pepper

12 X 1 cm slices of ciabatta or baguette

4 cloves garlic, pounded and mixed with 125 g melted Q.B.B. Pure Ghee

100 g grated Parmesan cheese

METHOD

  1. Heat Q.B.B. Pure Ghee and sauté the onion, capsicum slices and cherry tomatoes until soft.
  2. Add in the chopped basil and anchovies and the oil from the can. Season with salt and pepper.
  3. Rub the bread slices with the garlic and spread Q.B.B. Pure Ghee on them.
  4. Place the bread slices on an oven tray and bake 200° C for 10 minutes or until crisp.
  5. Remove the bread slices from the oven and turn on the grill to high.
  6. Divide the cooked capsicum between the 12 slices of toasted bread.
  7. Sprinkle with grated Parmesan cheese.
  8. Grill for 2 minutes or until the cheese is just soft and bubbling.
  9. Serve immediately.

Roasted Sticky Chicken – a Xmas treat!

Leave a comment

Roasted chicken

Not many people like to roast a turkey for Christmas, especially in Asia. Firstly, many do not have ovens big enough to roast a whole large turkey. Secondly, turkey is expensive. And thirdly, somehow many prefer chicken to turkey.  Here is a simple, yet very tasty and appealing roasted chicken recipe. You can apply the same techniques if you intend to roast a turkey. Just multiply the recipe according to the weight of the turkey. For example if the turkey is 6 kg, then you would have to multiply this recipe by 3 times.

100 ml freshly squeezed lime juice (reserve the squeezed limes for use as stuffing)

10 cloves garlic, finely chopped

3 red chillies, finely chopped

3 cm ginger, finely chopped

4 tablespoons soft brown sugar

2 tablespoons fish sauce

½ teaspoon salt

2 heaped tablespoons Q.B.B. Pure Ghee

40 g coriander roots, finely chopped

2 kg whole chicken, cleaned and dabbed dry

5 cloves garlic, peeled

2 onions, quartered

1 lemon, quartered

2 stalks lemon grass, bashed lightly

4 slices ginger

1 tablespoon Q.B.B. Pure Ghee

Salt and pepper

Sliced cucumber, sliced tomatoes and chopped coriander leaves for garnishing

METHOD

  1. Place the first EIGHT ingredients in a blender and blend till smooth and then strain.
  2. Place the strained liquid in a small saucepan and boil over medium heat till it thickens lightly. Turn off heat and let it cool. This stage can be done a few days before roasting the chicken. Keep the cooled sauce in the refrigerator.
  3. Place the whole chicken in a roasting tin. Place the garlic cloves, onion, lemon, lemon grass and ginger into the cavity of the chicken.
  4. Rub the remaining Q.B.B. Pure Ghee all over the chicken and sprinkle salt and pepper all over the chicken.
  5. Preheat oven to 180°C.
  6. Place chicken in the oven and roast for 40 minutes.
  7. Pour about 125 ml water into the bottom of the tin. Brush the chicken with the prepared sticky syrup. Cover the chicken with foil and carry on roasting for about 15 minutes.
  8. Remove the foil and brush the whole chicken again with the sticky syrup. Roast for another 15 minutes or until the chicken is golden brown, shiny and sticky, and cooked through.
  9. Remove from oven and leave aside for 20 minutes before serving.
  10. Pour the juices from the roasting tin, discarding the fat, into the rest of the glaze and pour into a small pan. Simmer over a low heat and taste, adding more sugar or fish sauce if it needs it.
  11. Serve the chicken with the cucumber, tomatoes and chopped coriander leaves.

Citron Panettone Cake

Leave a comment

panettone-39-600

Panettone cake is very easy to make. You don’t need to use yeast and there is no fermentation involved. It is rich and would taste better the following day. You can toast and butter it before serving to make it taste even better than it already is!!

Preparation time:   20 minutes

Cooking time: 40 minutes

Serves: 8


5 X 55 g eggs

280 g light brown sugar

380 g self-raising flour

5 g ground allspice or cinnamon

Zest of one lemon

380 g glazed citron peels, chopped

120 g black raisins, soaked in 2 tablespoons rum or orange juice for 40 minutes

125 g Q.B.B. Pure Ghee, melted

125 g butter, melted

1 teaspoon vanilla extract

Icing sugar, for dusting (optional)

METHOD

  1. Preheat oven to 180°C.
  2. Whisk the eggs and sugar in an electric mixer until pale and fluffy.
  3. Fold in the flour, followed by the remaining ingredients.
  4. Place the mixture either in two Panettone moulds (6×4½-inch), a loaf tin or a deep round baking tin, lined with non-stick baking paper.
  5. Bake for 40 minutes or until a skewer inserted into the centre of the cake comes out clean. The top of the cake should be golden brown.
  6. Cool for 5 minutes in the tin, and then turn out onto a wire rack to cool completely.
  7. Dust with icing sugar if desired.

Note:  To store the panettone cake, wrap tightly in plastic wrap. Then either place in a re-sealable plastic bag, or wrap in foil. It will keep at room temperature for up to 1 week.


Mocha Mascarpone Rolls

Leave a comment

Mascarpone Rolls

This is a real sweet and decadent treat!  Impress your friends and guests with this dessert.  Pour a bit of liqueur into the Mocha Mascarpone Icing. Omit the chocolate and make a plain sponge or whatever flavour you desire– let your imagination run wild!!!

Preparation time:   20 minutes

Cooking time:         15 minutes

Serves:                     6

3 large eggs

80 g caster sugar

80 g plain flour

30 g unsweetened cocoa powder

15 ml hot water (about 1 tablespoon)

Caster sugar for icing

METHOD

  1. Preheat the oven to 200⁰C.
  2. Grease and line a Swiss Roll tin with non-stick baking paper.
  3. Whisk the eggs and sugar together in a large bowl until thick and creamy (an electric whisk produces good result).
  4. Sieve the flour and cocoa together and fold into the egg mixture carefully with the water. Do this procedure very lightly and make sure you don’t knock out air from the mixture.
  5. Place into the prepared tin and tilt the tin to level the mixture, making sure it goes right into the corners.
  6. Bake for 12 minutes until springy to the touch.
  7. Dust a large piece of non-stick paper with caster sugar and turn the baked sponge out onto it. Remove the baking paper.
  8. Trim off the burnt or hard edges and make a 1cm dent along the width.
  9. From this end, roll it up with the paper in the middle. Cool on a wire rack.
  10. Unroll the sponge, spread the Mocha Mascarpone Icing and up roll again. Set the cake seam-side down on a serving platter.
  11. Spread the Chocolate Ganache over the roll with a palette knife. Use a fork to make wood-grain marks on the surface of the ganache.
  12. Dust with icing sugar or place any Christmas decorations on the cake. The cake is best served the day it is made, but can be stored in the refrigerator, wrapped tightly in plastic wrap, for up to 3 days.

MOCHA MASCARPONE ICING

200 g icing sugar, sifted

80 g milk chocolate, melted

300 ml mascarpone cheese, whisked till smooth

1 tablespoon instant coffee powder, sifted

100 g Q.B.B. Pure Ghee, room temperature

METHOD

  1. Cream Q.B.B. Pure Ghee and icing sugar until light and fluffy.
  2. Add the coffee powder, melted chocolate and mascarpone cheese and combine well till smooth. Refrigerated until ready to use.

CHOCOLATE GANACHE

150 ml whipping or double cream

Pinch of salt

150 g dark chocolate

METHOD

  1. Break the chocolate into a bowl over a pan of simmering water and stir until it has melted. Remove from the simmering water and leave to cool thoroughly.
  2. Add the cream and salt, stir well and leave for about 10 minutes.
  3. Stir until smooth and leave for 5-10 minutes to cool and thicken.


Spiced Layered Cake

Leave a comment

LapisCake

A gentle warning – you can only do this cake well if you have an oven with grill function. This Spiced Layered Cake also known as Lapis Cake makes an awesome gift. As you may all know, this cake is quite expensive to buy; however, when you read this recipe and bake this cake, you will know the amount of effort that is needed to make this cake justifies its price. Since the cake is rich with 20 egg yolks, eat moderately. Serve the cake, sliced into very thin pieces. You can keep the cake for up to two weeks in the refrigerator.

20 egg yolks

5 egg whites

1 tablespoon rum (optional)

200 g caster sugar

170 g Hong Kong flour (available in most supermarkets)

2 teaspoons mixed spice powder

2 teaspoons Ovalette (available in all cake ingredients shops)

200 g salted butter

100 g Q.B.B. Pure Ghee

2 tablespoons condensed milk

300 g pitted and chopped prunes, chopped dried apricots or durian pulp

METHOD

  1. Preheat oven to 220°C ensuring that both the top and bottom heat are on. Once your batter is ready, use the grill function only (top heat).
  2. Grease an 8 1/2″ X 8 1/2″ X 4″ tin and line with non-stick baking paper.
  3. Prepare a water bath in a small metal bowl. Put the empty baking tin into the oven to warm it up. This step is done so that the batter will flow smoothly and will be well distributed in the tin.
  4. Beat egg yolks, egg whites, rum, sugar, flour, mixed spices, and Ovalette till batter is pale and thick.
  5. Cream the butter, Q.B.B. Pure Ghee and condensed milk well.
  6. Fold in the creamed butter into the batter gently.
  7. Turn on the grill. Place the bowl of water in the oven. This will help to create a nice temperature so that the cake will not be too dry.
  8. Spoon 3 tablespoons of the batter into the greased tin. Level batter with a spatula or tilt left and right to level the batter. Grill the cake for 3-4 minutes.
  9. Gently press cake layer using a spatula to remove excess air.
  10. Pour in another 3 tablespoons of the batter, level it and arrange the prunes on the batter. Grill for 5-7 minutes or till golden.
  11. Repeat Steps 8, 9 and 10 till all the batter and prunes are used up. (Add prunes once for every 2 layers of batter).
  12. When the batter is finished, switch to oven function and turn down to 180°C. Bake the cake for about 15 minutes and then let it cool thoroughly before slicing it thinly.


Cranberry Almond Cookies (eggless)

Leave a comment

Dried cranberries are available in all the supermarkets these days. In this recipe, though I am using dried cranberries to prepare for the festive season, you are most welcome to use raisins or chopped dried apricots. Instead of almonds, you can also use walnuts or pistachios but I must tell you that almond goes very well with the cranberries and the topping of that awesome white chocolate kisses! You can reduce the sugar. I can guarantee that the cookies will fly off the jars before Christmas!

150 g Q.B.B. Pure Ghee

100 g salted butter

150 g caster sugar

2 tablespoons golden syrup

1 teaspoon vanilla extract

200 g dried cranberries

140 g almond flakes

250 g Top flour

Handful of Red and White Striped Chocolate Kiss Candies (optional) or other kinds of chocolates

METHOD

  1. Preheat oven to 180°C and line baking tray with baking paper.
  2. Cream Q.B.B. Pure Ghee, butter and caster sugar until soft and smooth, and then add in golden syrup and vanilla extract.
  3. Mix in cranberries and almond flakes, and lastly the flour. Combine to form a soft dough.
  4. Roll into small balls and flatten lightly onto the oven tray.
  5. Bake at 150° C for 20 minutes, or until the bottom and edges of the cookies are pale golden in colour. However, the middle must be still soft.
  6. Press a Red and White Striped Chocolate Kiss Candy into each warm cookie and allow the cookies to cool on the baking tray for about 5 minutes before transferring to a rack to cool completely.
  7. Store in airtight containers.

Thai Green Chicken Pie

Leave a comment

Green Chicken Pie Crop


One season following another!! Yes, Christmas is round the corner. So dear fans and friends, I will be releasing some Christmas related recipes. First in the series is this Green Chicken Pie recipe. You can make several mini pies with this recipe too!

2 tablespoons Q.B.B. Pure Ghee

50 g Green Curry Paste (you can buy from any supermarket)

1 lemon grass, sliced thinly

200 ml coconut cream

150 ml water

500 g chicken breast meat, sliced into 2 cm thin slices

160 g eggplant, cubed

1 green chilli, chopped

1 teaspoon sugar

3 kaffir lime leaves, torn

Handful of sweet basil leaves

1 tablespoon cornflour mixed with 2 tablespoons water

METHOD

  1. Heat Q.B.B. Pure Ghee and sauté the green curry paste until aromatic.
  2. Add in all the rest of the ingredients except the cornflour. Cook, stirring occasionally till chicken is cooked.
  3. Thicken with cornflour mixture.
  4. Let the cooked Green Chicken Filling cool thoroughly.

TO MAKE THE PIE

500 g puff pastry (you can find this from the freezers in major supermarkets)

1 medium egg, beaten with 2 tablespoons water

Cooked Green Chicken Filling

METHOD

  1. Heat oven to 220°C.
  2. Roll out the puff pastry to about the thickness of 2 X 50cents coins and big enough to line small pie dishes or a large tart tin.
  3. Place several spoonful of the cooked filling into the pie dishes. Ensure you do not put too much as it will bubble out the pastry.
  4. Brush the edges of the pastry with the beaten egg.
  5. Roll out the remaining pastry and carefully place the pastry lids over the top, pinching the two edges together.
  6. Make a small cross with a knife in the centre of each pie. Brush the top of the pie with the beaten egg.
  7. Bake for 40-45 minutes.
  8. Serve.